When it comes to making a decision about something I’m not the kind of person who wants to do so without making an attempt to know absolutely everything possible about the subject. It greatly inhibits my progress on tasks as I get caught up in the details, yet when things get going I rarely have massive issues I haven’t thought about or found out about in preliminary research.
Let’s start with what I knew.
- I loved how it looked.
- Bamboo was invasive, except for clumping bamboo which could still be invasive according to everyone with an opinion and anecdotal story.
So when faced with so little knowledge I did what I always do. Go deep net and educate myself. If you ever tackle a project I highly recommend starting with a spreadsheet.
Much like my BAMBOO.RESEARCH.xls
(I have numerous additional book pages and scribbled notes everywhere that aren’t in the spreadsheet but it gives you an idea of my proccess.)
I’m not going to rewrite the internet, you have google I highly recommend you highlight any terms you’re unsure of in this article, right click and choose “Search Google for….”.
I’m hoping this information will give you a few things to think about and perhaps give a bit of direction.
Firstly I read up on Monopodial (Running) and Sympodial (Clumping) rhizomes.
Then I thought about why I wanted bamboo other than for it’s aesthetic. Firstly I wanted fast growing privacy hedges from my neighbours. With decks and high set houses beside me I wanted a beautiful green screen to inhibit views into my living spaces and yard as well as block their living spaces from my view. My block of land is not tiny but there’s only a few metres separating the houses to the sides so whatever screening I chose needed to have a small footprint. As a general rule tall trees have wide crowns and a root spread equal to that crown spread, making trees unfeasible for narrow space growing.
I also needed quick biomass for my permaculture project which bamboo could provide as well as using the culms for garden structures like stakes and trellises.
It is ludicrously fast growing. I could achieve what I wanted very quickly.
Some concerns and considerations.
Problem: Finding a reliable supplier where I wouldn’t get a running bamboo infestation and then need to move house. With the anecdotal evidence of ‘cowboy suppliers’ selling wrong types of bamboo to make a buck, this was a valid concern for me.
Solution: Focus on the nurseries on the Bamboo Society Of Australia website as well as any sellers with consistent word of mouth recommendations on forums.
Problem: Will it be a problem for the neighbours. Remember these will be very tall plants. They can lean over fences, knock houses in storms and block out sunlight very quickly.
Solution: Talk to the neighbours and educate them on your reasons for choosing bamboo if they have any fears of infestation of running varieties.
Problem: Which variety is the best for my requirements given the hundreds of local options available and me not having a clue.
Solution: Look at the areas I want to plant bamboo and work out and document what the bamboo needs to do to satisfy my requirements. Eg. Privacy screen in an area needs to grow in a 2m wide bed but also has to have a dense thick foliage at the top all while attaining 8metres in height and not push over the fence! Familiarise myself with varieties provided by local/regional suppliers so when I do har or read about a bamboo I’m somewhat familiar with it’s characteristics.
Problem: How will I know what will work?
Solution: Take photos and be very descriptive with what I’m trying to achieve so that someone has been provided with the best information possible to then give me suggestions . Use math. Trigonometry and datum points will prove very useful.
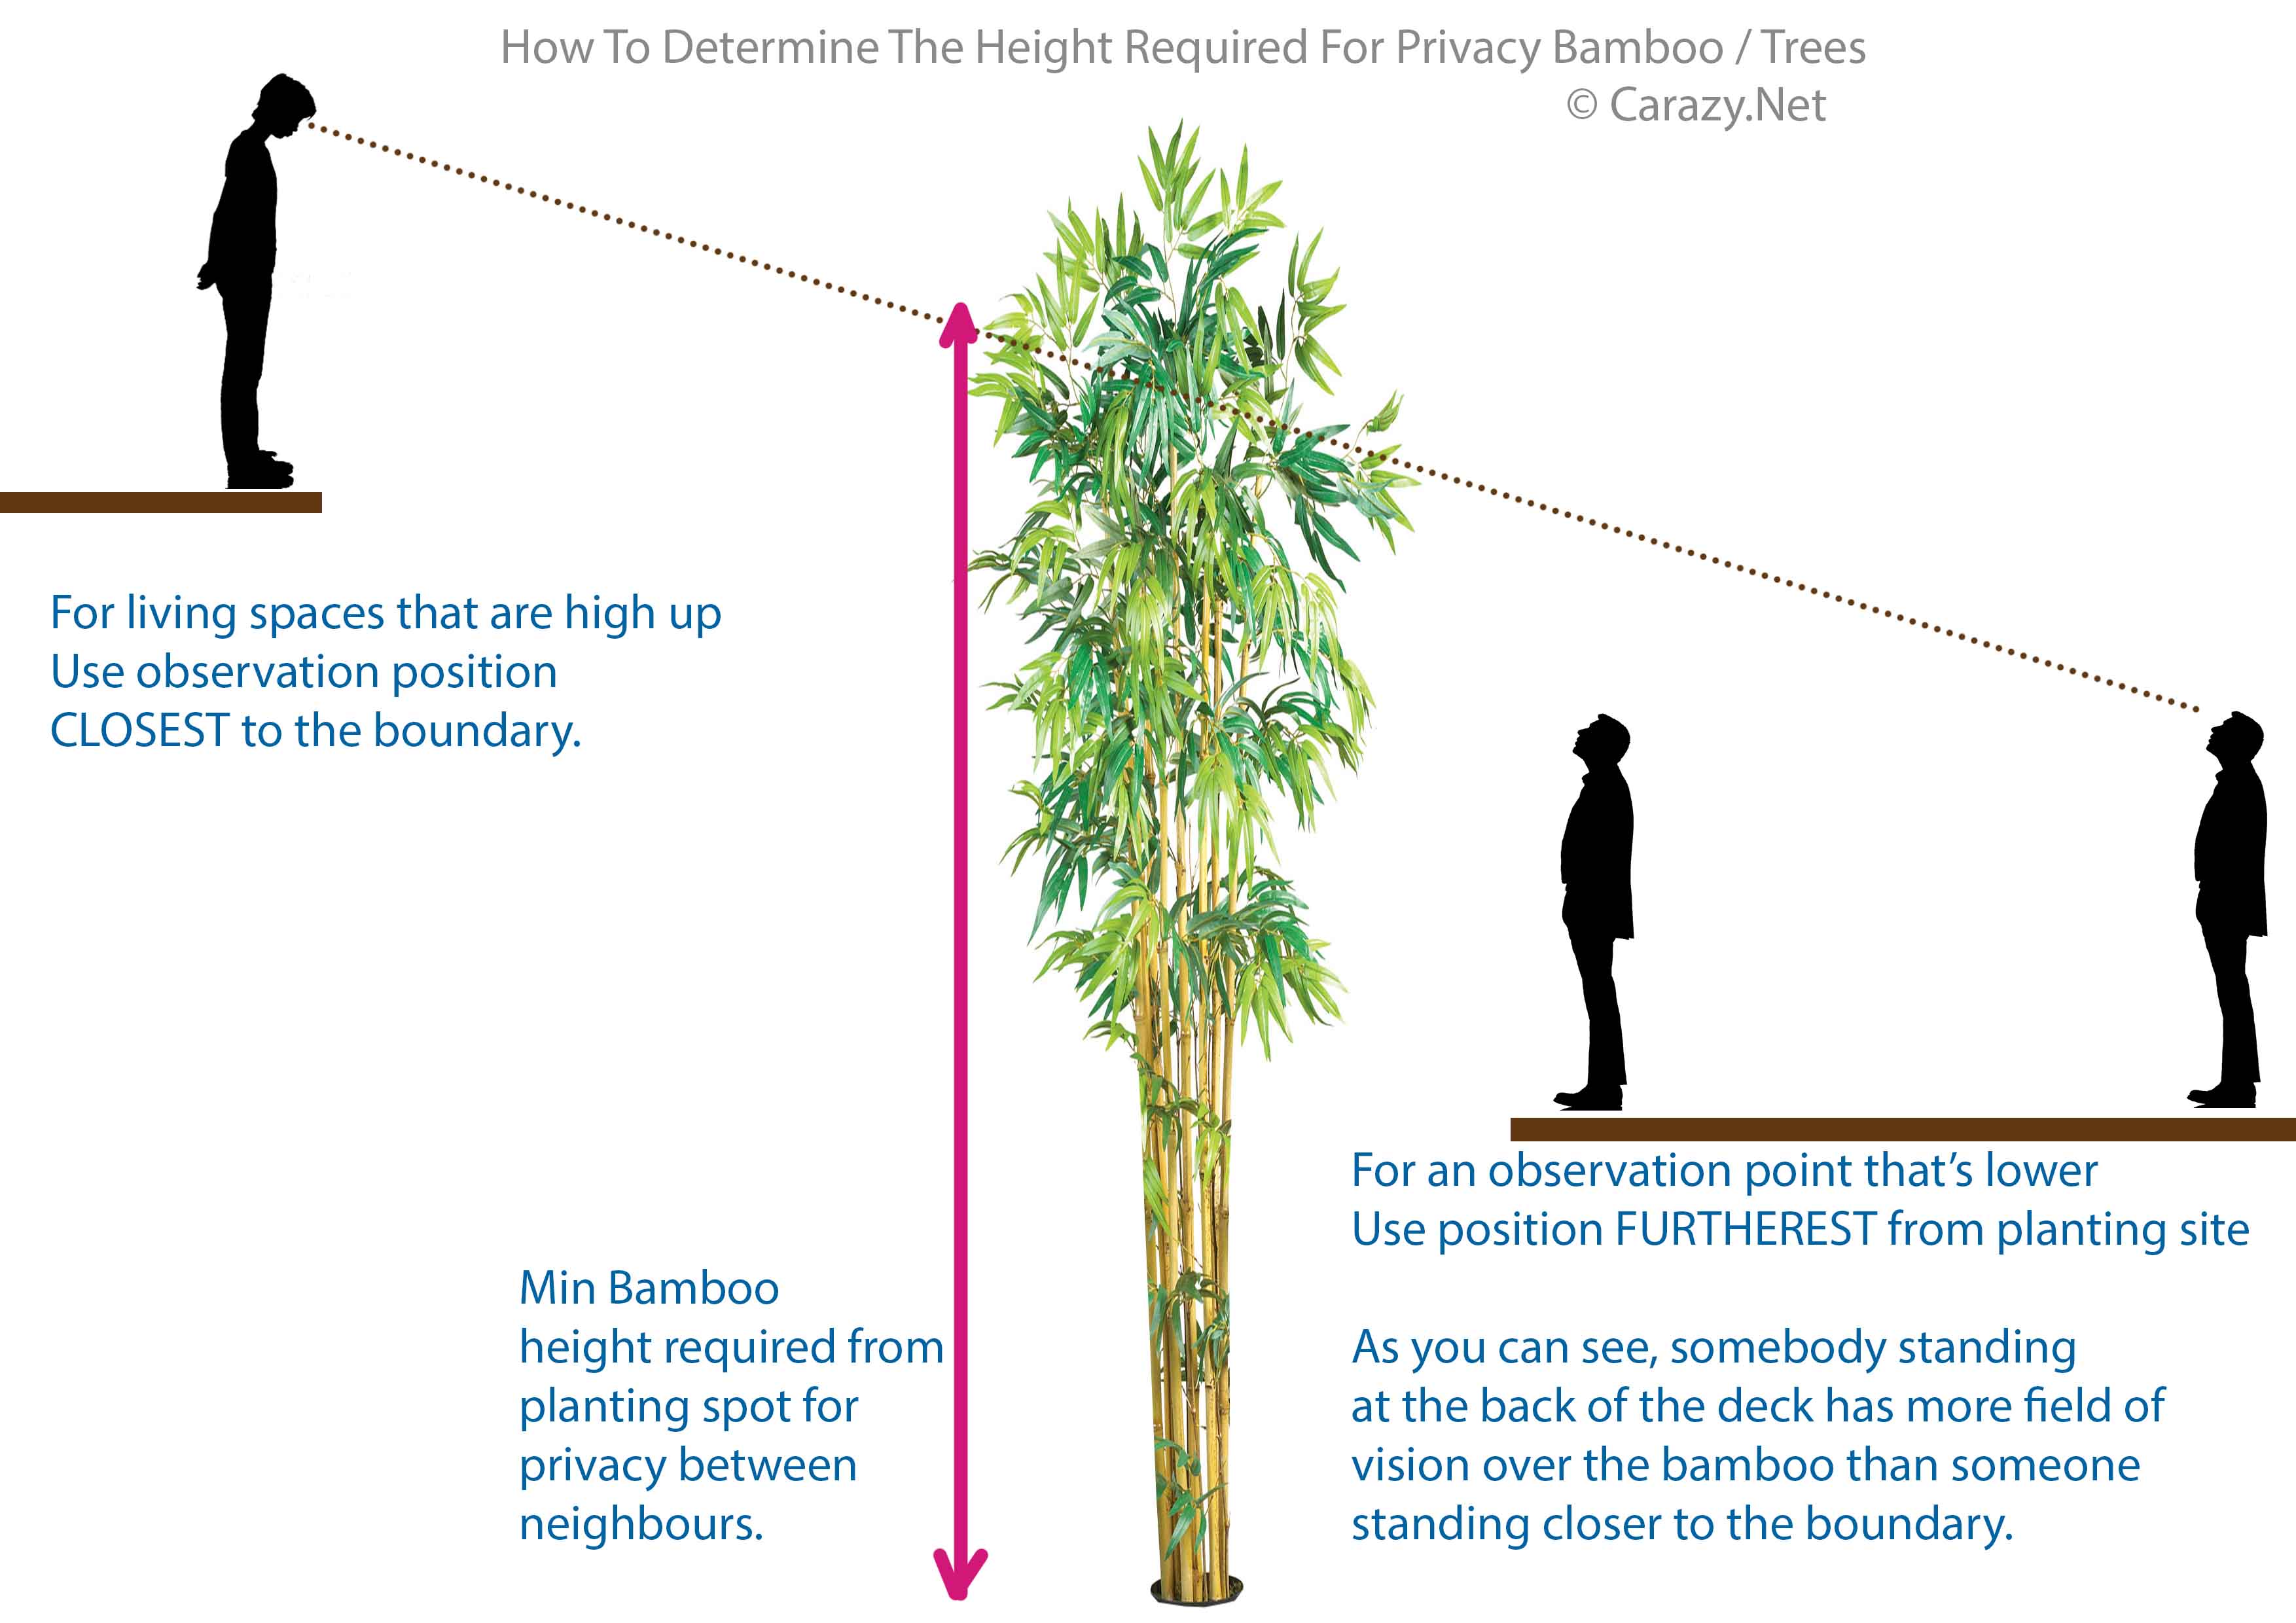
So I took the photos. I measured angles and heights a billion times and then emailed a heap of wholesale growers. The email below may seem epic but it’s mostly photos and every person who replied pretty much understood what I was trying to achieve. My point is if you’re going to ask someone for recommendations arm them with the most information you can. I’ve included a few of the emailed responses below as well. I followed up with a lot more questions as well via phone.
Other general questions that weren’t absolutely answered from my research.
Q:Will the variety of bamboo grow properly in some of the narrow spaces which get a tiny window of sunlight during the day? If so will it have less foliage as a result of lower photosynthesis?
A: All said it would grow fine but I was told differing things regarding growth rate. All said lots of fertiliser and water would be needed for thick foliage.
Q: If stepping on a new shoot is an easy way of preventing bamboo clumps spreading in a certain direction, after a few growing seasons will it give up radiating in the direction of the continually snapped off rhizomes/culms or always try and attain it’s desired clump shape?
A: I was told it would always keep trying to attain its natural clump shape.
Q: How wide does the base of the clump get for each variety if left to grow wild.
A: This was my pet peeve. The lack of info and abundance of misinformation regarding this was extremely frustrating. I ended up doing my own measurements. More on this later. Generally what I found is whatever maximum clump diameter the growers told me, I doubled it. On a farm or acreage that extra metre may not mean much but in suburbia it could be the difference between an access path being blocked off, the fence being pushed over or damage to your or your neighbour’s buildings.
=======================
From: Me
Sent: Friday, 4 April 2014
To: Bamboo Supplier
Subject: Bamboo recommendations (Growing in Brisbane)
Hi,
I’m in the planning stage of establishing some privacy and was considering bamboo to do so but there are 2-3 positions where I’m concerned about the growth and shape of the taller bamboo in say 5-10 years. Could you please assist with some bamboo recommendations. To narrow down options – Negate any golden/ striped culmed bamboos (not a fan).
I guess I need 1-2 recommendations for each of the three larger plants.
I’ve taken a few pics which may help you visualise what I’m trying to achieve. (I added a lot of extra info in there for myself which you probably don’t need)
(So I guess my wishlist in order of priority)
-I’m looking for Blue and Greens.
-Dense evergreen vertical growth so as to minimise lean, especially into neighbours yard knocking on their houses.
–Evergreen all the way up culm (from at least 2-3m from base) because what’s the point if 4-6months of the year the culms are bare see through sticks.
Thanks in advance.
___________
RIGHT HAND SIDE PRIVACY
Corrugated wall on neighbour’s house is only 1.2m from fenceline so I need to ensure it is a very vertical plant with foliage all the way up.
I was thinking Fusca as I’m not sure if Gracilis would screen the top deck. (Ignore the 4-5m across part, it’s there for me)
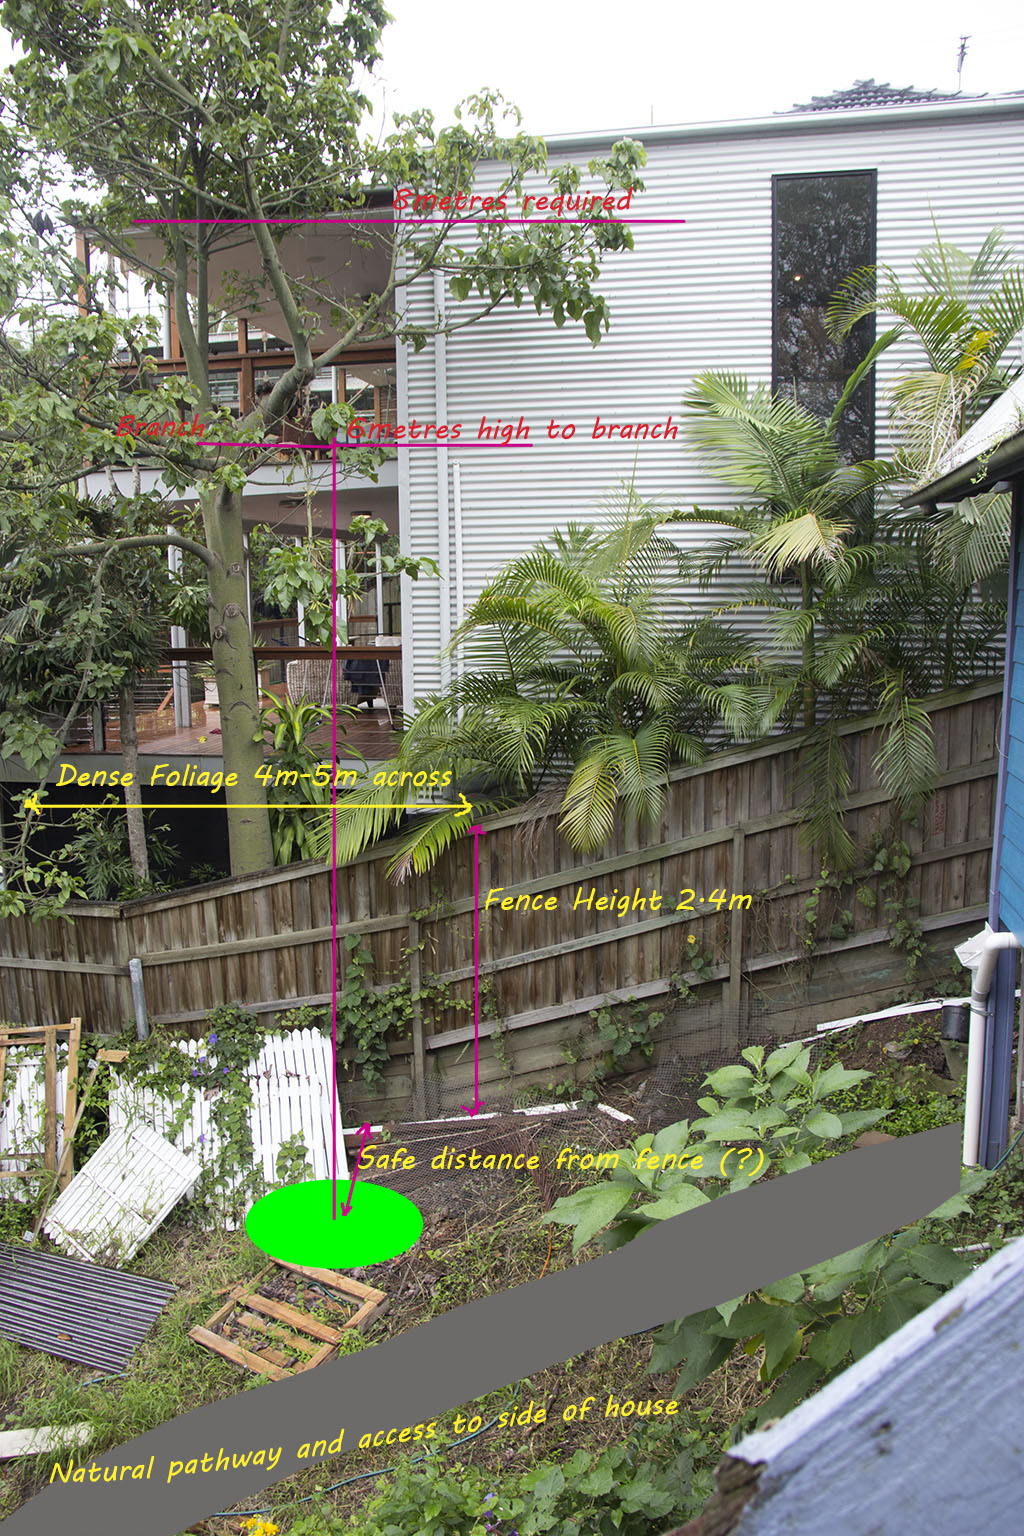
Supplier 1 replied : 8MH – Fusca (8-10MH) or Gracilis (6-8MH)
Supplier 2 replied : “The B. Textilis Fasca would be an option, but it does get quite large at the base, and will grow to at last 10m tall. Some other options are Bambusa chungii ‘Barbaletta’, or Bambusa dolichomerithalla ‘Blue’. Both will grow to around 8 meters, but remain a bit more tighter clumping at the base than the Fasca. If you plant both of these species at 1 to 1.5 meters apart, then you will get a good thick screen. You should also plant a minimum of 1m from the fence (1.5m away from fence if there is no footing or foundation under fence to stop roots).
Supplier 3 replied: (See complete reply at bottom of this correspondence)
Supplier 4 replied: (See complete reply at bottom of this correspondence)
Other reply : Fusca will be fine. Its base will grow to about 1.5m in diameter but you will need to remove any new shoots that shoot up outside of this area. It’s relatively easy as they all come up at the same time from February onward. Removing them is easily done by standing on the young emerging culm and breaking it. This only needs to be done once a year.
| MY CHOICE IN THE END : |
2 x Bambusa Textilis Gracilis |
| Reasoning : |
I really needed very vertical growth to ensure the fence would not be pushed over, nor tall culms whacking on the house next door/ their big glass window during our subtropical storms. |
====================================
LEFT HAND SIDE
The house on the left isn’t a major privacy issue but I’d still like some in the form of a nice 7-8m tall feature plant. It will be behind a Wamin (Giant buddha).
It is a little bit further away from the boundary but still vertical growth is a must.

Supplier 1 recommended : 7-8MH feature plant – probably Barbelletta (6-8MH)
Supplier 2 recommended : “Similar to above – you could use either B. Dolichomerithalla Blue or Barballetta. I also think that the Slender Weavers Bamboo (Bambusa textilis var. Gracilis) would be sufficient. It will usually grow to about 7 meters if you fertilise and water regularly.”
Supplier 3 replied: (See complete reply at bottom of this correspondence)
Supplier 4 replied: (See complete reply at bottom of this correspondence)
| MY CHOICE IN THE END : |
1 x Bambusa Chungii var. Barbeletta & 1 x Bambusa Vulgaris cv. Wamin |
| Reasoning : |
I already knew I wanted the Giant Buddha Belly (Wamin). I could not find any decent photos of the Bambusa Dolichomerithalla cv. ‘Blue’ and the ones I did see suggested very little leaf growth in the lower parts of the plant meaning no privacy looking through the upright bare culms. The Barbelletta was a consistent recommendation and would make a beautiful ornamental feature to view from my deck. |
=======================================
BEDROOM PRIVACY
People from the road and my neighbour can see straight into my bedroom if the blinds aren’t closed. The intended 7m plant is privacy from the neighbour’s walkway/deck which can be just seen behind the tree branches. I was looking at Barbelletta for the big plant. Wrayii for the 6m middle and at the top a Schizostachyum sp Tamiang.
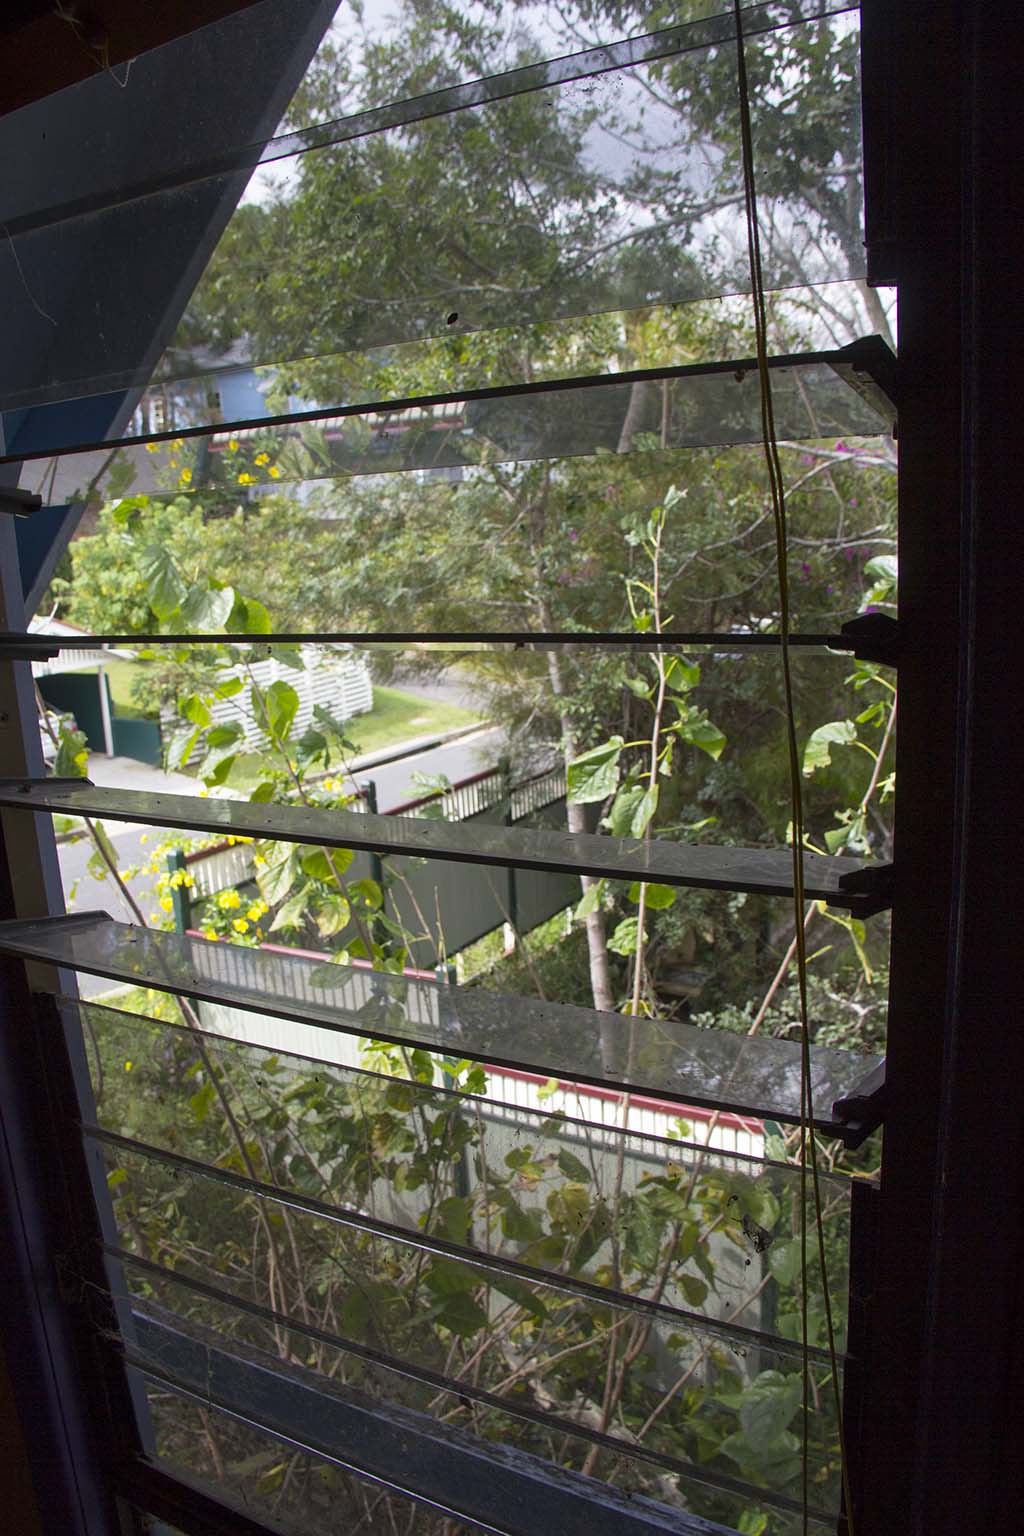

Supplier 1 replied : 7MH – Gracilis or Barbelletta (6-8M H)
Supplier 2 replied : “Your selections seem to be suitable. I prefer the S. Murray Island (rather than Tamiang) – very similar foliage and shape, but the Murray Island doesn’t get flower heads on it (which the Tamiang gets). The flowering is not very ornamental and tends to stress the plant a bit. “
Supplier 3 replied: (See complete reply at bottom of this correspondence)
Supplier 4 replied: (See complete reply at bottom of this correspondence)
| MY CHOICE IN THE END : |
1 x Bambusa Textilis Gracilis / 1 x Gigantochloa Wrayii / 1 x Bambusa multiplex cv. ‘Goldstripe’ |
| Reasoning : |
The Gracilis would form a nice dense screen hiding the deck. It would also be a narrow footprint and I could hedge it uphill. The Wrayii has nice thick foliage all the way down the plant and was the perfect height. The Goldstripe was a last minute change. I was told my other choices could look a little ratty if conditions weren’t perfect and despite my aversion to yellow culms I was told this was actually quite green and only small sections of gold broke up the green striated culms. It also provides a dense short 4m privacy hedge. |
=============================
NARROW SIDE CORRIDOR
This is where I had planned on Gracilis in an 800mm wide bed. I’ll be building a 400mm raised bed and digging down 200mm below that and installing root barrier as a precaution, because it’s so close to the fence. I have no access for machinery on my land so I have to choose wisely. I really need a dense privacy hedge along here. The neighbour’s carport on the left is right on the boundary and looks straight into my upstairs area through the large windows that I have to keep constantly closed. It needs a minimum height of 5m. but I had thought to get something at the 6m mark to block the harsh western sun that comes from the left. After seeing a Gracilis with a thick 2.5m x 2m base yesterday in a back yard I’m now super skeptical about the whole “Gracilis can be planted in a narrow half metre wide bed” claims. I definitely do not want this to be an expensive and laborious poor life decision down the track. I’d just like some feedback on this.

All suppliers replied that Gracilis was the best variety that would satisfy my requirements here so my choice was correct. In follow up questioning there was differing opinion as to how many plants I’d need. Some suggested that 3 plants would mean competing for nutrients and therefore keeping height closer to the 6m mark rather than 8m potential. Others suggested that 2 plants would be better as there would be the root mass of only two plants to maintain and only two plants pushing laterally in the bed. There was also differing opinion on sunlight requirements. Some suggested the bamboo would grow taller faster because it would be reaching to the sunlight up top while the others said it would grow fine in the low light narrow space but slower.
Supplier 3 replied: “Hi. Thanks for contacting us and supplying all the info in such detail. There are a few varieties that spring to mind straight away worth considering.
Food for thought:
Boniopsis –
Murry Island –
Chungii –
Gracilis –
White Ghost –
Unfortunately I have to head off to an appointment now so can get back to you later this evening or tomorrow with more detail if you require. Hope this helps.
This was a good shortlist but left me with questions as to where in my plans they thought it might best go. I managed to call the next day and got a bit more information regarding the shortlist.
Supplier 4 replied: “Hello. Textilis gracilis is straight with lots of leaves up the top and probably only max 1 mtr of culm showing, if you plant them close together (or any species) e.g. 1 m.
Or the multiplex: alphonse karr is nice and if planted close together doesnt get too big in height nor culm/pole size.
I dont know of any bamboo that is non ‘golden’ or is e.g. black that can grow like you ask. There are 2 varieties that are ‘blueish/pale green’ but they would probably grow too big. Ghost and chungii. If you hedge bamboo in the early stages it grows lower branches.
I could recommend others but they might not get high enough for you or may get too high.”
I bet you’re glad that’s the last pic!
Have an awesome day.
</END EMAIL>
| MY CHOICE IN THE END : |
2 x Bambusa Textilis Gracilis |
| Reasoning : |
The Gracilis would form a nice dense screen hiding the carport. It was the only narrow footprint bamboo that could get to 6m and was consistently the recommendation of almost ever supplier. I opted for two as I worked out they would fill a 3m bed just fine. |
=============================
| ADDITIONAL PURCHASES |
1 x Bambusa Textilis Fusca / 1 x Bambusa Guangxiensis |
| Reasoning : |
I wanted a nice tall feature plant at the bottom of my property that would hide the neighbours below me. I figured if I got the Fusca as a centrepiece I could propagate and put Gracilis beside it in a row to create a beautiful dense green wall of bamboo at back fence. Both being part of the Slender Weavers family they would match nicely together.
The Chinese Dwarf would be a good propagation plant for a short hedge I plan of creating once I finish my decking project. |
I also purchased to Striped Buddha’s Belly for a friend. I had thought about getting a Bambusa heterostachya Variegated (Malay Dwarf) as well but I’d reached my limit of 10 for the courier freight pricing. Fortunately a friend had heaps of Malay Dwarf rhizomes ready for me from his mature plants so it wasn’t an issue.
===========================================
In the end I made my list of desired bamboo and priced them up with a few of the wholesalers. A few of the local suppliers who I would have preferred to purchase from unfortunately didn’t have a number varieties in my purchase list so had to be negated. Freight was going to be a big factor in the final bill. Some suppliers were further away while others simply had better deals struck with their courier company. Then there’s customer service and website design. I love a well designed informative website. Ideally I would have liked to have ordered from Bambooland. Their customer service and information provided was awesome and they had everything in my list. The only reason I didn’t go with them was this purchase order was made during my experiment to see if I could live on $100/week and the extra $72.50 was significant to me. In hindsight I should have offered them the chance to price match as it was only a couple of plants which really pushed their quote up. Given it’s just plant material, time, love and water their costs wouldn’t have been much different to the other suppliers. Don’t get me wrong, the other suppliers were pretty awesome too, they just didn’t have all the varieties I wanted, in stock at that time.

