How To Build A Wicking Garden Bed using an IBC / Tote

I’ve been wanting to build a wicking bed for some time now but the high cost of waterproof membranes / pond liners always put me off. IBC’s (Intermediate Bulk Carriers) / IBC Tote / Pallet tanks are white plastic cubes used to transport liquids. Quite often they are a one use item only, especially in the food industry. They are often snatched up and re-used in agriculture as stock feed and water tanks. They hold a 1000 litres and are of a solid construction meaning they would be ideal as an alternative to buying pond liner.

IBC-Intermediate Bulk Carrier


Make sure you ring and verify what the IBC previously held. You don’t want anything that’ll take ages to clean out and you especially do not want anything with toxic chemicals in it.
I rang the seller to check what was previously in it and was told detergent, so I bought two for $60 each. Once they’re cut in two it’s basically a 2.4m x 1m garden bed for $60-
Also check that the IBC has a good screw cap on the top lid and on the tap at the bottom.

Dismantling the IBCs is super easy. You could get them cut to size in a day especially if you have someone assisting. I did both of mine on my own so it took a little longer.

____________________________________________________

STEP 1: Remove the two locking bars using a T40 Torx head screwdriver. (In a pinch, if your screws aren’t tight you might be able to get away with using an Allen Key that fits)


Read more

Setting up the Wicking Bed with modified large capacity reservoir

Wicking beds work on the wonderful ability of water to defy gravity via osmosis, moving moisture upwards from the bottom of the bed to the plants at the top. Think of them as a giant version of the little tray that sits under pot plant pots and holds water. Over the days the plant slowly draws it up as required.

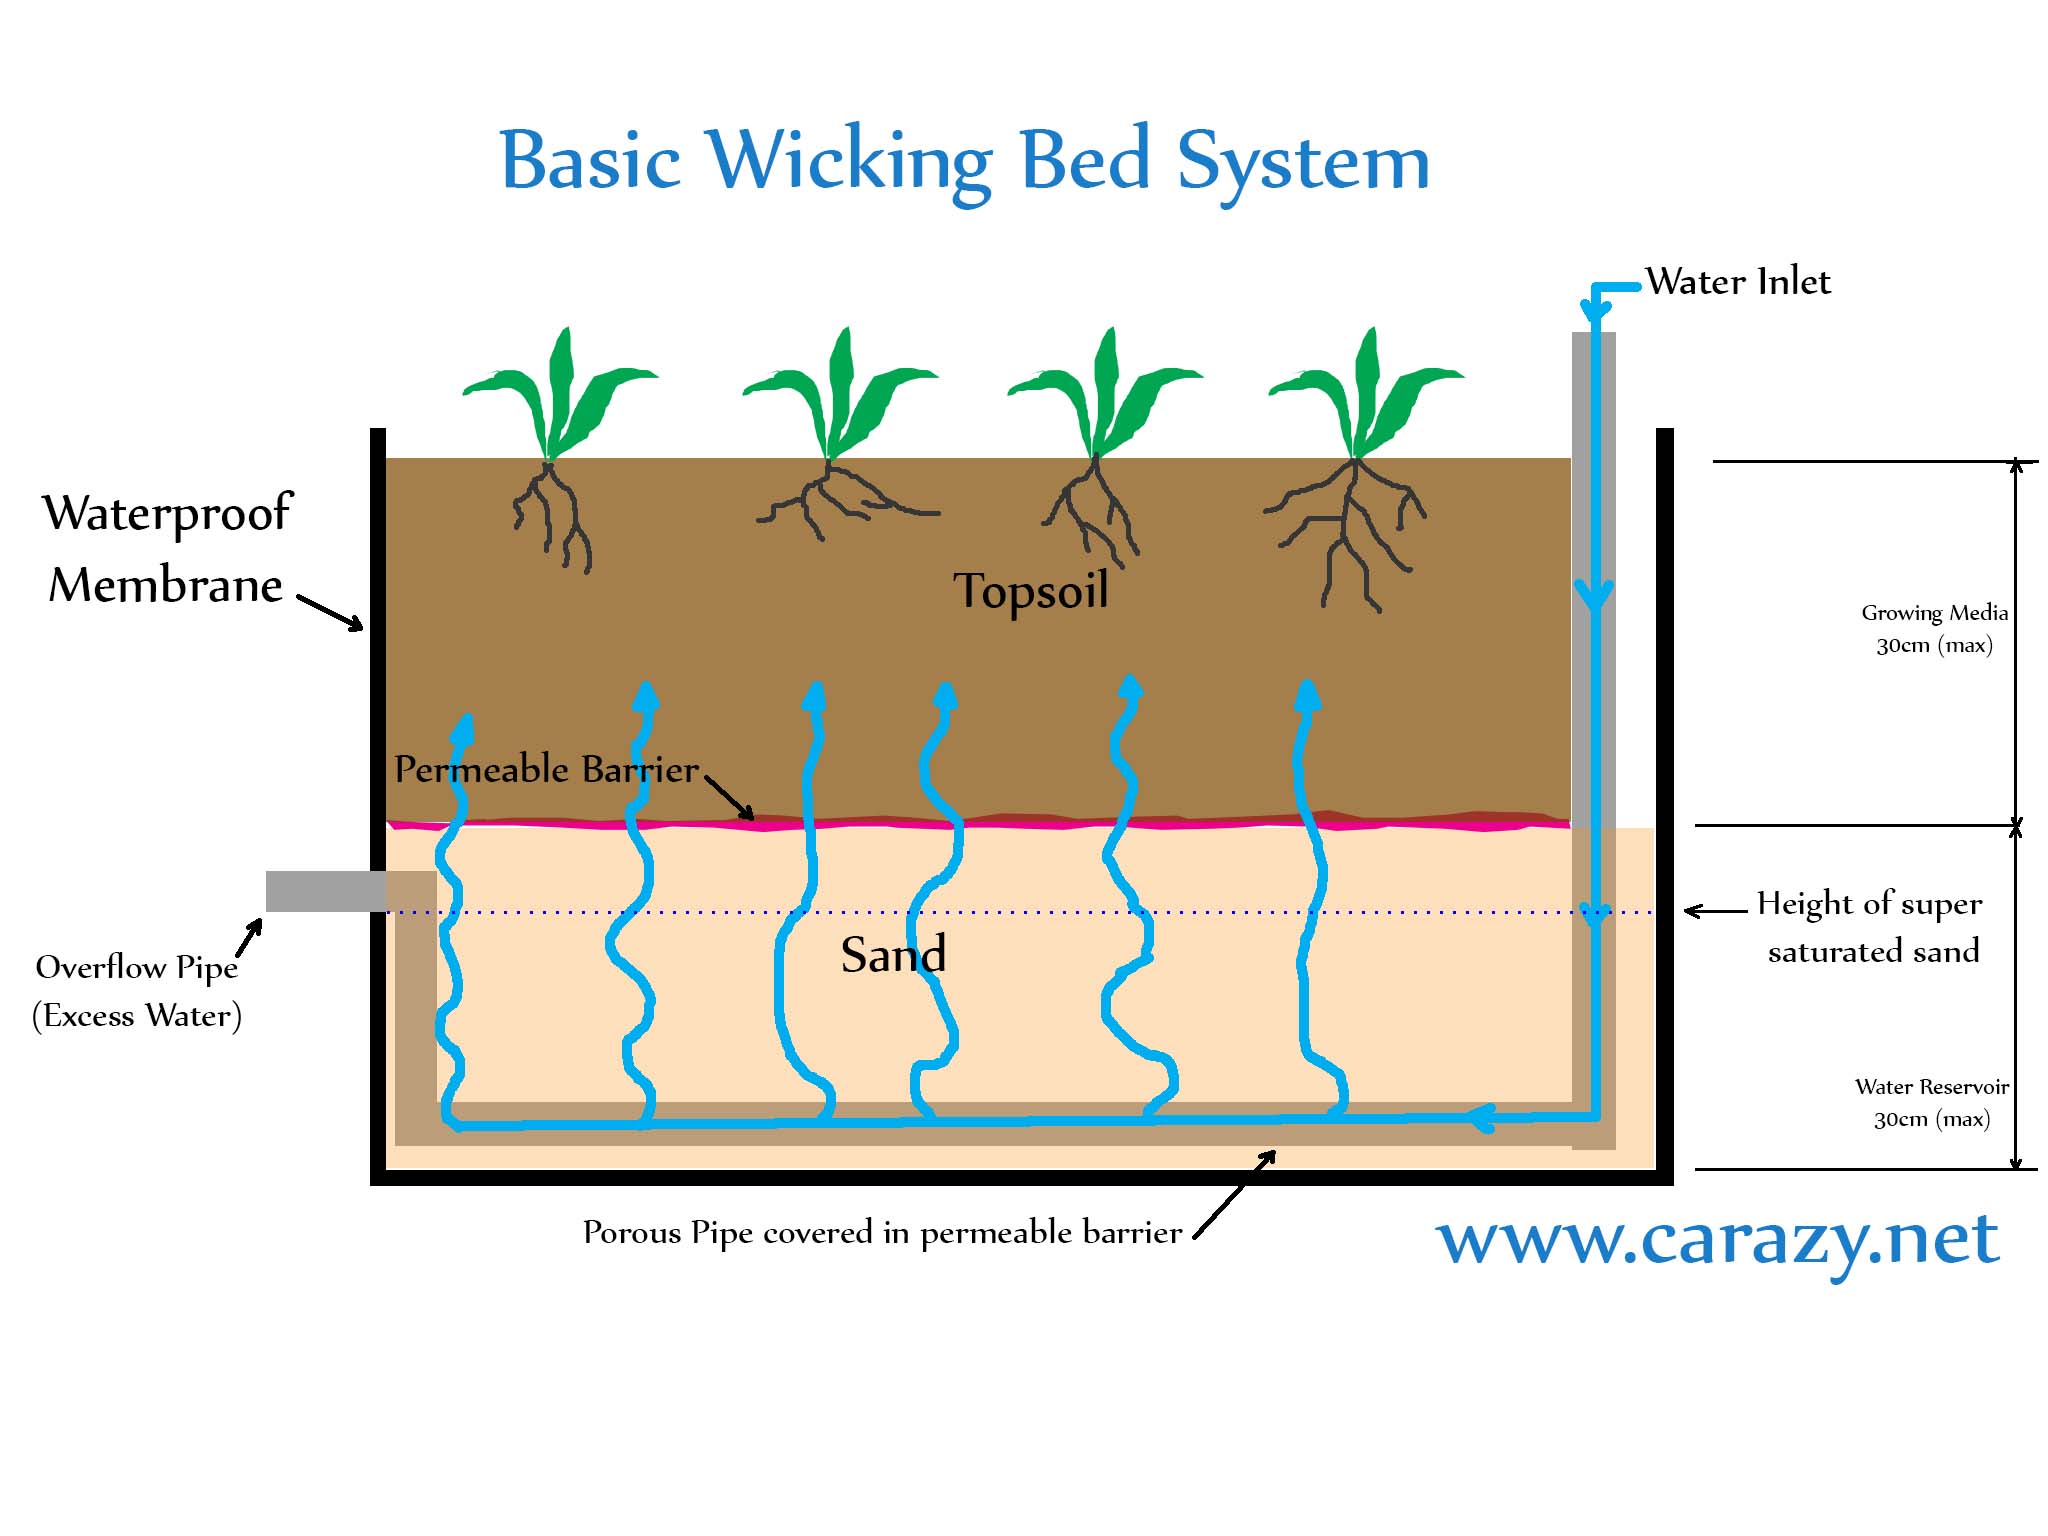
A basic wicking bed has a porous, water filled tube running from the top surface to the base. This is covered with a permeable barrier like shadecloth or geotextile to prevent sediment from entering while still allowing water to pass through. The bottom half of the wicking bed is then filled with sand.
An overflow pipe sits just below the upper surface of the sand and limits the amount of water that will sit in the bottom of the bed.

A sheet of permeable geofabric is then placed over the sand to prevent the fine silt from the topsoil layer seeping into the spaces between the sand and clogging it’s wicking ability.

The upper layer is the growing media in which the plants put down roots and soak up the water on demand. It is recommended that each layer not exceed 30cm (1′) as distances above that have decreased water wicking ability.


I opted to build my bed using an IBC (See the build here) I pimped mine out with some modifications that I believe are vastly superior to the basic design above. I added a large void to increase water holding capacity and chose different media to increase wicking potential, reduce weed contamination and greatly improve ease of handling of materials.

I’ve done a separate post on the different materials I’ve used and why, as there’s a fair bit of info on each of the components. You can check it out here.
Comparison of wicking bed media.
Wicking beds need to be on level ground. Living on a steep hill meant I had to create the level areas. I recycled the old deck I previously stored my now crashed motorbike on and used the bearers and joists to create a level framework for the IBC’s to sit on. I chose an L shape so my design still involved getting six different ends all perfectly level. This was extremely time consuming but if your yard is flat just plonk the IBC down on the ground you lucky thing!


Read more

Wicking Bed Media Comparison and Conclusion

This is an addendum to the post Setting up the wicking bed with modified large capacity reservoir
 

There are a number of ways you can go about building a wicking bed. Many of the decisions involved are to do with what media you will use.

Living on a limited budget I spent countless hours looking at free alternatives to the many options available. Some friends had to sandbag their house from flooding so once they were done, rather than throw the bags in the tip, I asked if I could re-use it.

When the time came to start filling the wicking beds I had a quick attempt at washing the free sand as it was extremely silt & clay laden. The process took so long, used far too much water for my liking and the sand left was still not cleaned to my satisfaction. So I came to the decision that I’d have to purchase the wicking media, but how to do it without breaking the bank? Some serious number crunching was needed.


    THE LOWER RESERVOIR WICKING AREA

DESIGN
I chose to use plastic crates wrapped in geofabric for two reasons. Firstly it would create a large void where only water would sit, allowing for greater availability of water, especially during periods like holidays where I wasn’t at home for a week or two. Secondly the more space taken up by the water reservoirs meant less wicking media was required to be purchased. So to maximise this I opted for two large voluminous cavities per bed. I calculated that the double chambers would use up around 125L (33gal) which was half the volume of the reservoir area so that was pretty awesome.


Read more